Are you a photographer who loves creative frames rather than taking those same style of pictures over and over again. If you are one of the creative Photographer here is one cool technique which might be lot of fun and sometimes really addictive since the results are a real stunner. I am sure you may get your friends/followers asking you – ‘how did you get that?’
In this article I will explain how to shoot multiple exposure Photos with reference of the image I shot above.
You need
· A DSLR that is capable of handling multiple exposure
· A friend who could help you by being a model (and super patient)
· A tripod
What is Multiple exposure:
It is technique widely used in Photography where the camera will be exposed multiple times and the resultant shot with each exposure will be superimposed to form a single image. So it’s actually two or more images stacked upon each other and you will get cool interesting results.
Equipment needed:
Not all Cameras support multiple exposure technique. So you may need to check whether your Camera support this feature.
- I have used a Canon EOS 7D Mark II body and I would explain with some images for better understanding of the steps
- I would strongly suggest you to use a Tripod if you want a shoot a static frame or your shutter speed is less. If you want to move around with and shoot different frames use with your hand.
I will not dive deeper into the how to navigate to this menu or how to use this feature in your Camera. I would rather focus on the different options or ways you can shoot photos using this Multiple exposure technique. You can refer these links if you need any help with it “Multiple exposure feature in Canon” or “Multiple exposure settings on Nikon“.
Multiple Exposure modes:
Additive:
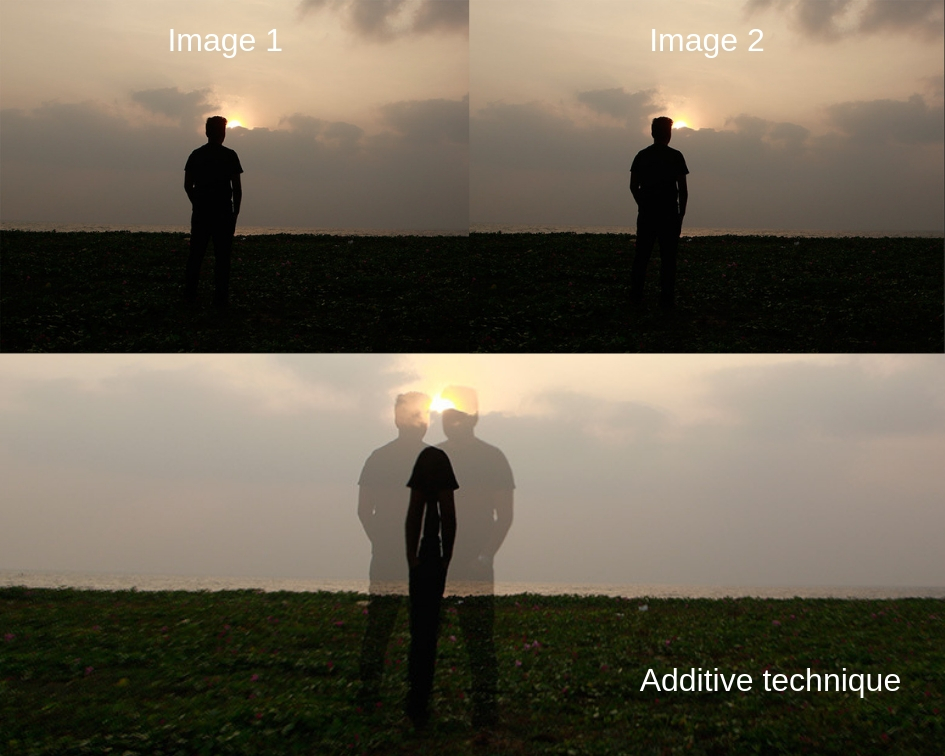
Each single frame or exposure is stacked over one another in this mode resulting the subject to darken a bit in the places where the movement overlaps. Since the exposure were added you need to compensate for it by reducing the exposure value while shooting. Two exposures: -1 stop, three exposures: -1.5 stop, four exposures: -2 stops. And the resultant image will have the exposures added up of individual images and here you can see that in between the subjects where the intersected area is darkened whereas other areas of the subject is lightened up.
Average:
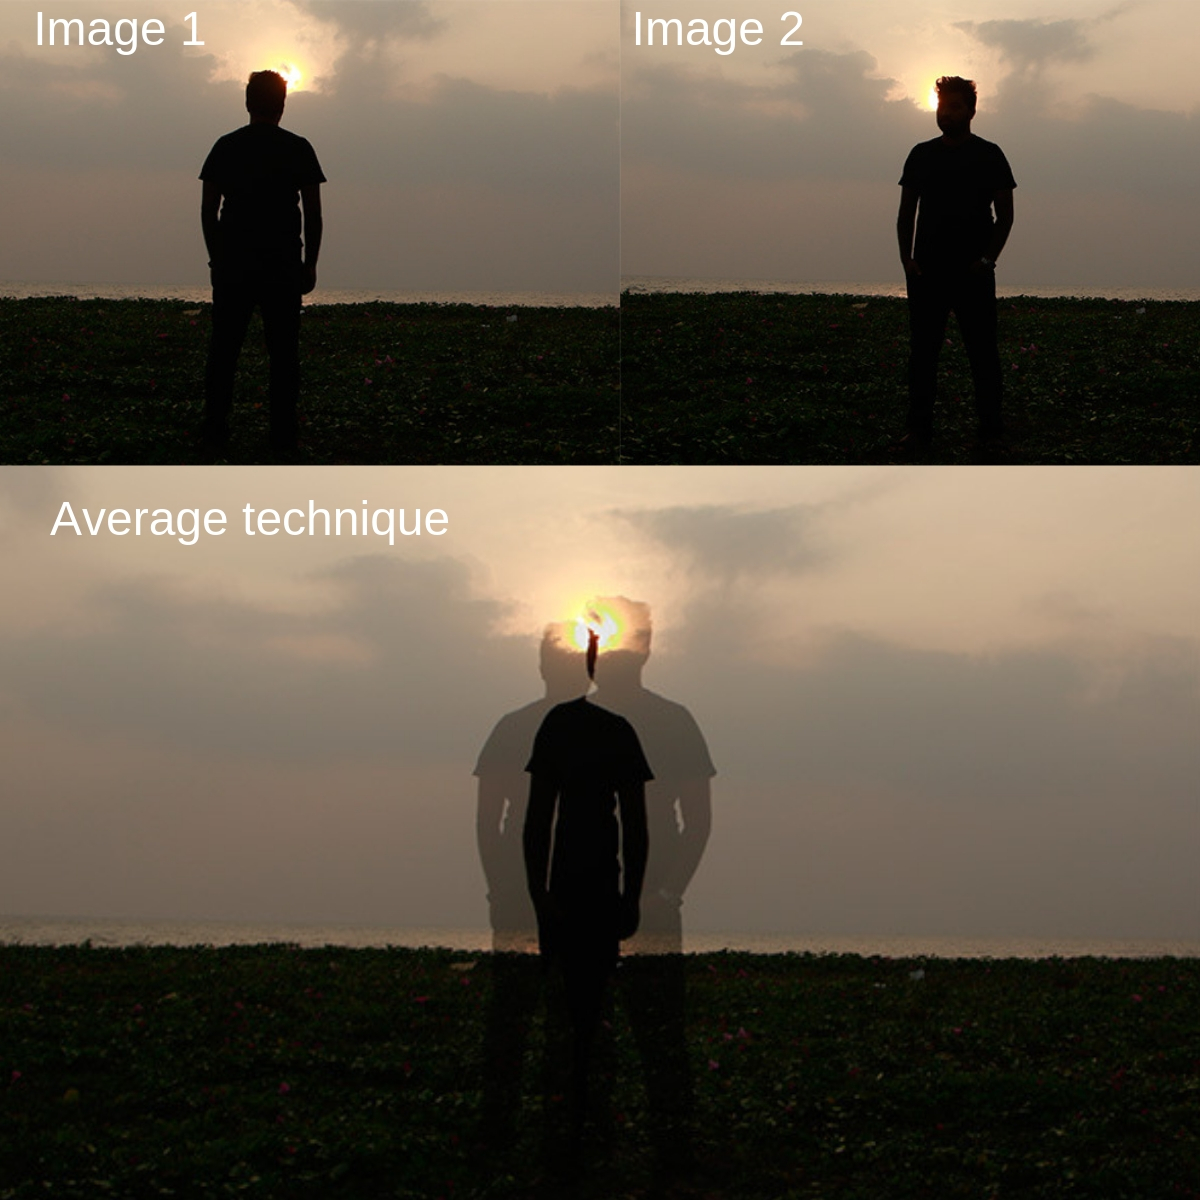
Unlike additive the exposures won’t add up and therefore no compensation is needed. Average exposure of all the frames will be exhibited in the final output. Since the Camera will only choose the average exposure in the final result the place where subject movement is not overlapped is omitted from the final image.
Bright:
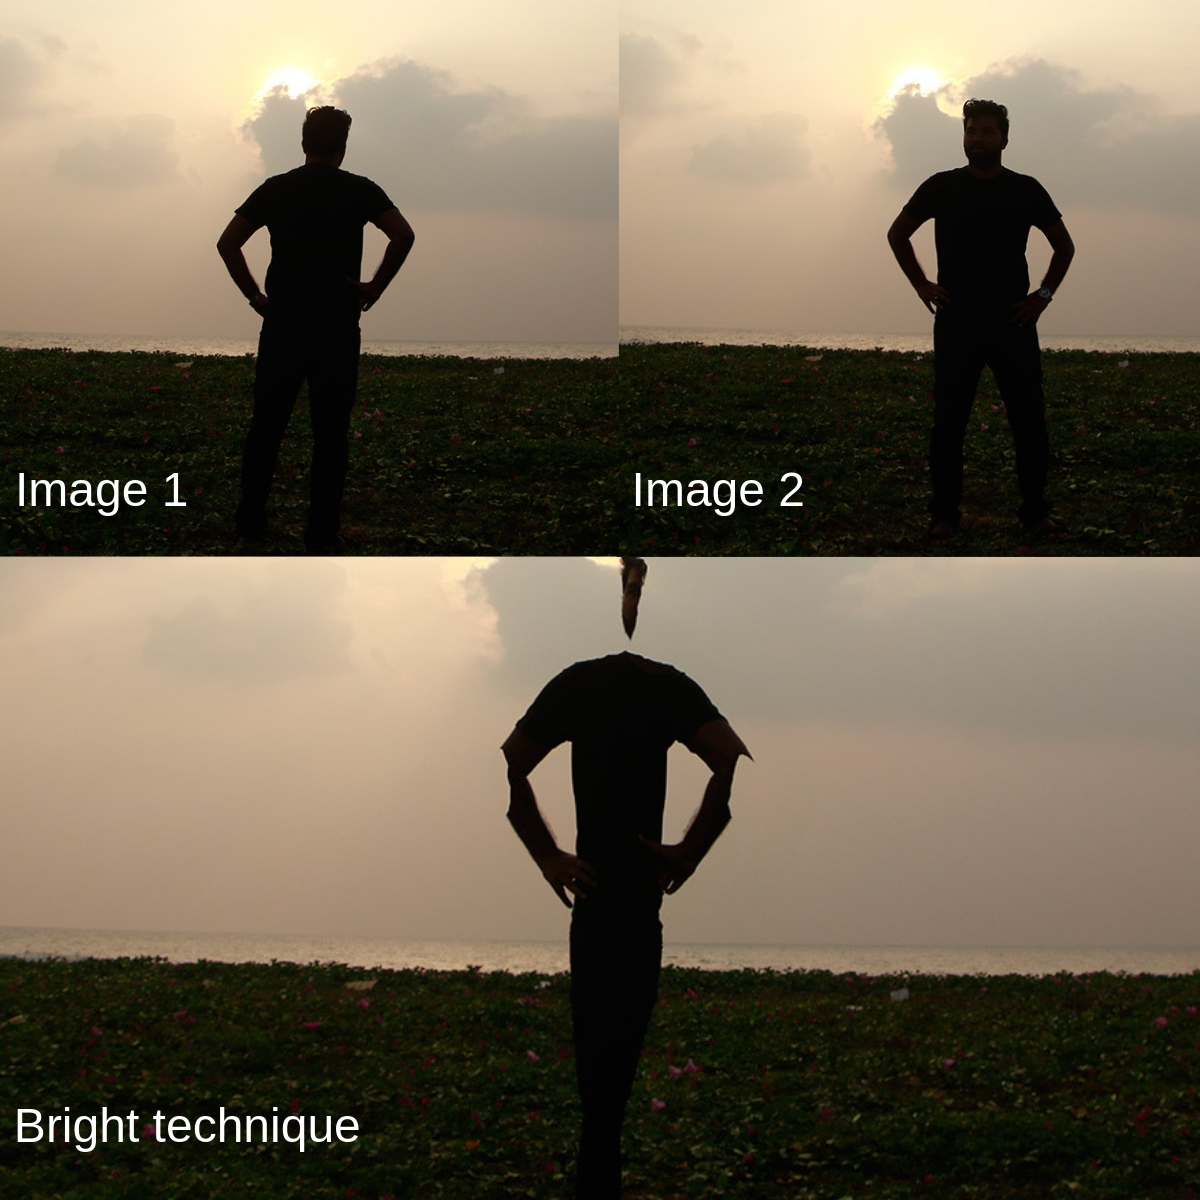
This feature is used when you need only the bright areas in your image to be highlighted and dark areas in the image will be masked. This feature is quite useful for blending techniques and create some interesting composition.
Dark:

This is my favorite technique of all where the dark portion of the images are very much highlighted. This will be a great fit when shooting silhouette images where you need the dark portions to be very much highlighted.
Additional tips:
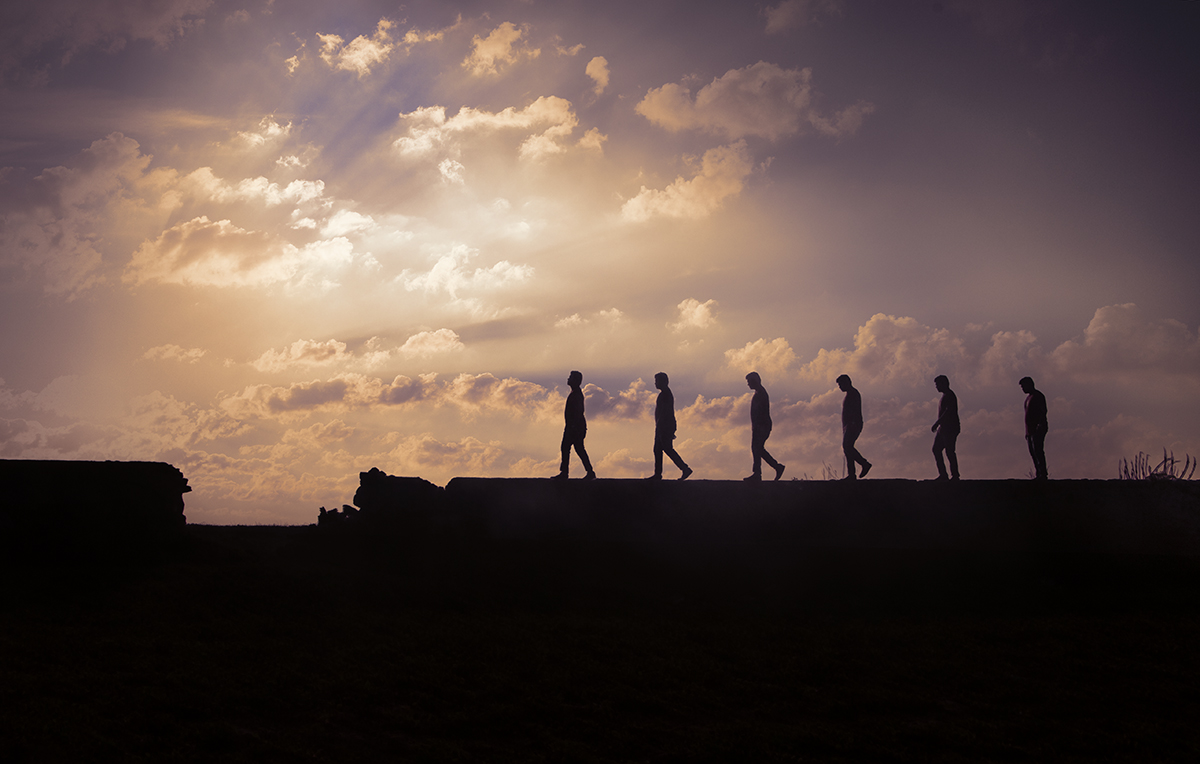
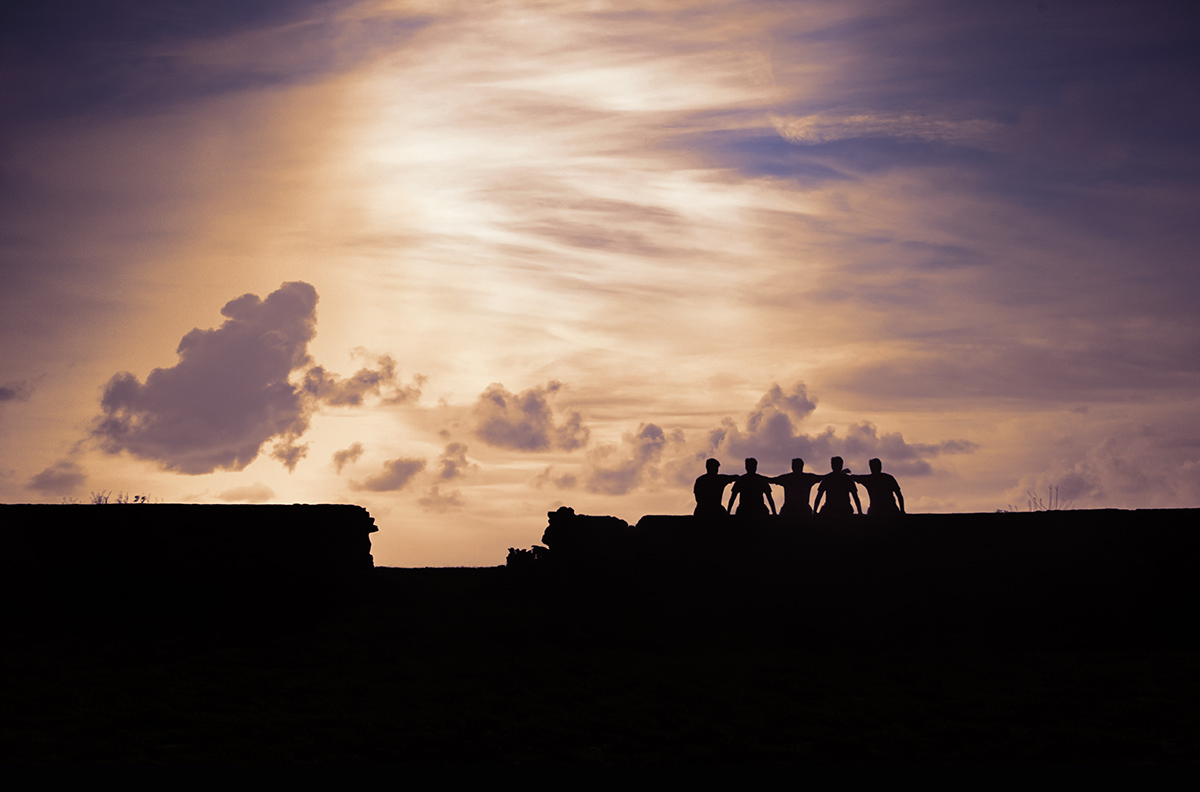
For multiple exposure to be effective get a story in your head and visualize it. For example my story of this picture is – ‘ A person needs to seek light in his worst times’. So I decided to go for 5 exposures. That is exposing your frame to 5 times – that will make a person look like walking with different transitions. From looking down in the first frame to looking up in the last frame.
Find a suitable location that will suit your story or the concept that you have planned for your photograph. In my case I had to look for a vast space and a space that depicts the ups and downs of life. So we found this broken wall in a beach shore for the shot. You can also experiment these kinda shots in a studio or indoors. Just make sure the location sticks to your visualization.
Cycle through ‘Single shooting mode’ or Burst mode depends on the Photo you need to create.
Get Creative
With pinch of creativity you can create wonders with this Photography technique. Use this technique with interesting ideas and your photos will certainly stand out. In this below Photograph I made the subject to sit next to each other with different stance and as a result I got this and this is one of my favorite Photographs I shot using Multiple exposure technique.
Apart from fun & creativity this technique when coupled with black and white mode does really help you deliver some interesting stories.
Happy shooting!
Hi
Trying out a multiple exposure on my camera but my figures are all coming out ghost like. I don’t know why. This ever happened to you? I’m basically taking three exposures of myself in a large room with a window so there’s some light and some dark. Ten second timer to avoid shake and give myself enough time to assume a motionless position. And redo a couple more times in different positions round the room. Only thing is my bodies are coming out ghost like, at like 50% opacity. Settings are iso 400 f/8 shutter 1/60 so image is a bit dark but I don’t mind that. Any idea why my bodies are ghosts? I need them ressurected 😂