Light is the most important ingredient when comes to great photography and there is no single formula which can clearly convey how to make natural light work for you. When you acquire the knowledge to utilize and shape light to your need – great photographs are made.
Most of us have started to overlook the possibilities of shooting completely in natural light due to the growth of controlled artificial light sources. These light sources make it so easy to alter the intensity. Also great control over post processing tools to modify your photographs at just few clicks has reduced the amount of effort we put in to get the light right in camera has considerably reduced. Truth to be told we got used to this comfort from artificial lights and lost touch with the art of wielding natural light. With time and patience to practice this art, you will see your photographs improving leaps and bounds.
Below are some of the tips that seemed to have worked for many photographers out there. Before all that let’s take you through basics of natural light and it’s characteristics.
What is Natural Light?
When I say Natural light it means it is the light from the Sun. Even though this light originates from a single source it has many flavors depending on the time of day and location. Trust me its never the same and the possibilities of combinations of the time of the day and the mood is endless. When you look at the Kelvin scale of color temperature below you can observe how the color temperature and flavor of light varies from morning to evening.
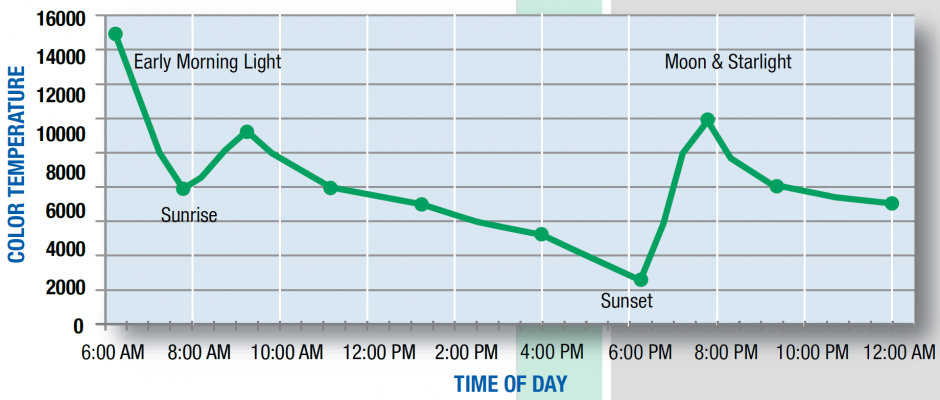
Source: Sigma Luminous
Looking at the above graph you can deduce the light before the sun rise and after sunset has high color temperature which means the light will have lot of blues in it. Higher the color temperature the light will be cooler and lower the temperature the light will be warmer and has more red in it. The mid day is considered to be neutral and has dominant whites in it.
Study light
The best way to understand how natural light works is really to be an observer. Have an eye for looking at things and understanding how the light fall off on the subject is, what colors look vibrant / muted against natural light makes you a great observer. Studying light is an art which is practiced not only by photographers but also by painters, artists and even writers to describe about light.
Spend good amount of time to understand the light that’s moving through the day, how mood changes with light and so. Over time you would understand light better. This would improve your eye for detail at the time of shoot – as in, you would know where to make your model stand or place your products according to the natural light.
Try this:
Choose a subject and try taking photos of it in different time of the day. Observe the differences
Modify the light
Using natural sunlight as it is or just making the subject stand right opposite to the source of light may not work a magic all the time. Sometimes you need to tweak it to bring a whole new mood to your frame.
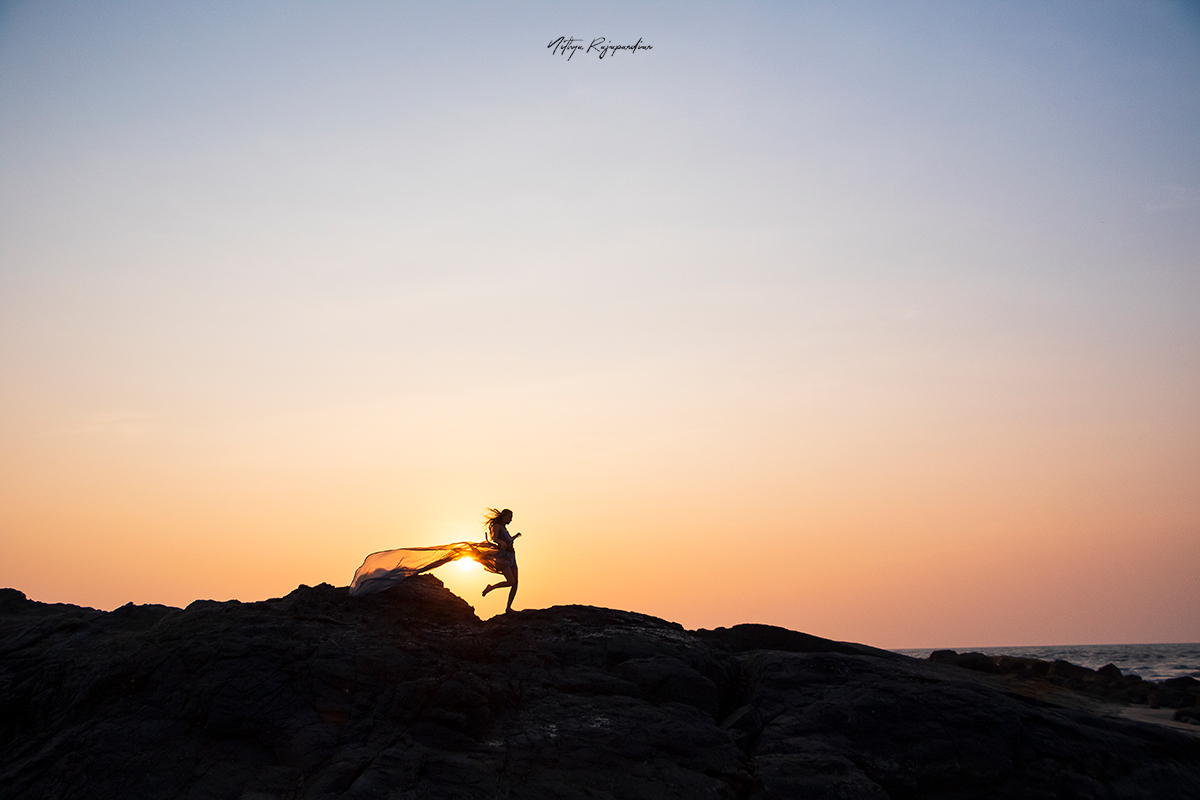
i) If you want to tell a silhouette story with your models then back-light is your key.
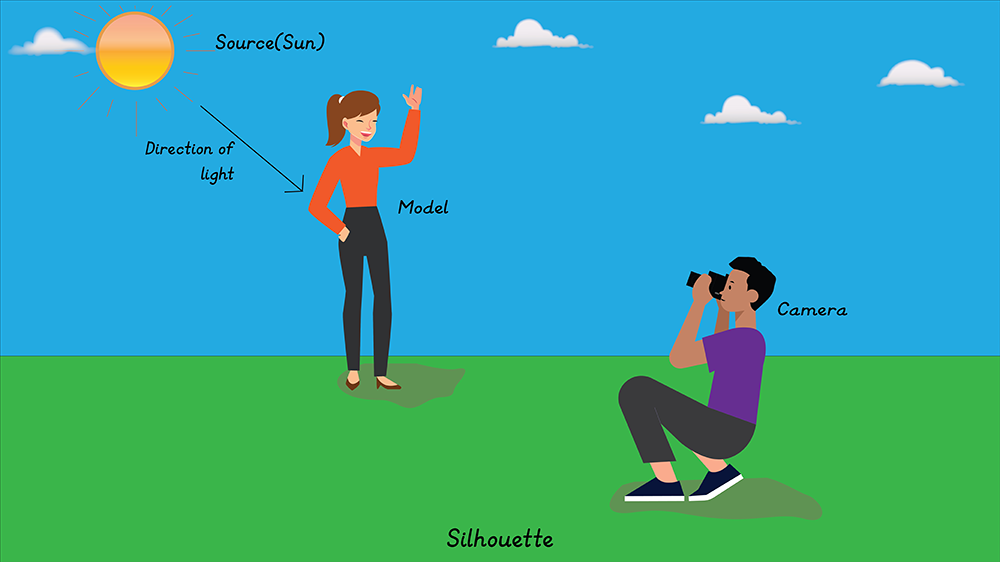
Below is the Photograph where I have used the natural light as back light to create a silhouette.
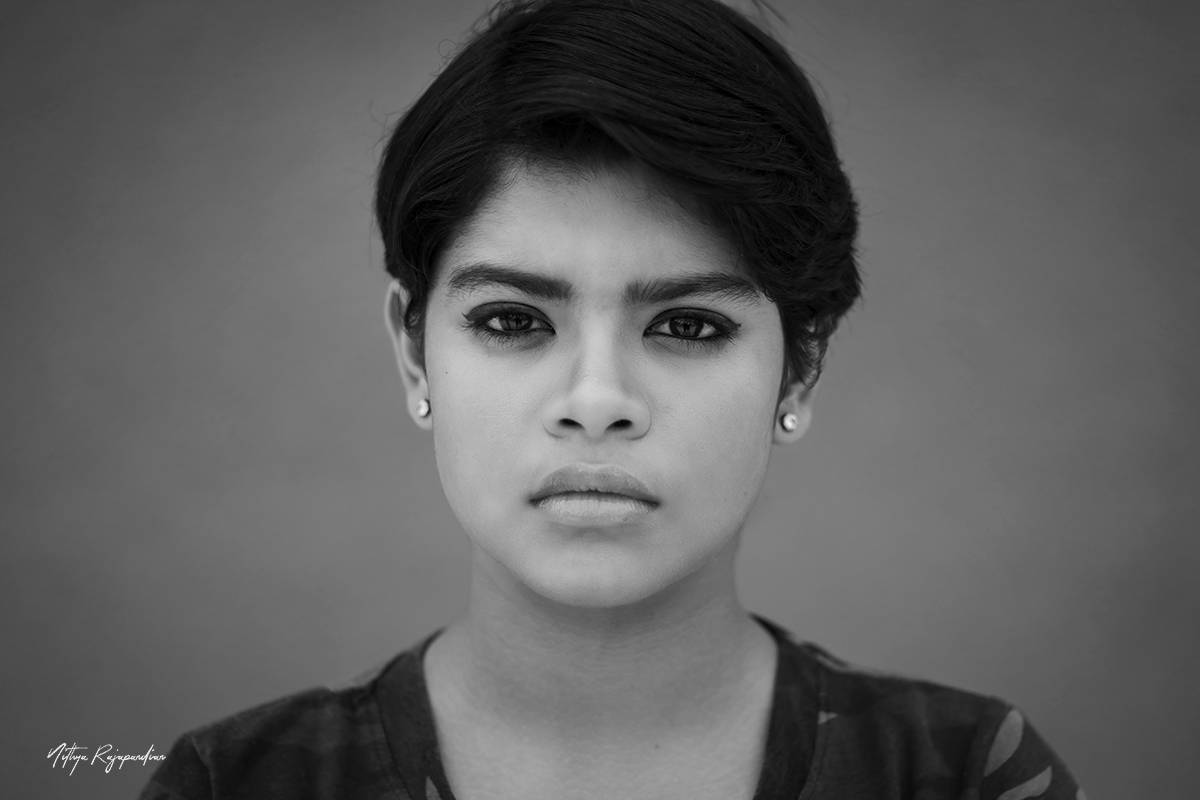
ii) If you need a under exposed ambiance then it is better to make the subject stand as the same direction as the source of light then using a reflector to reflect the natural light on to the subject. This would make the natural light softer and allows you to shoot photos at under exposed ambience.
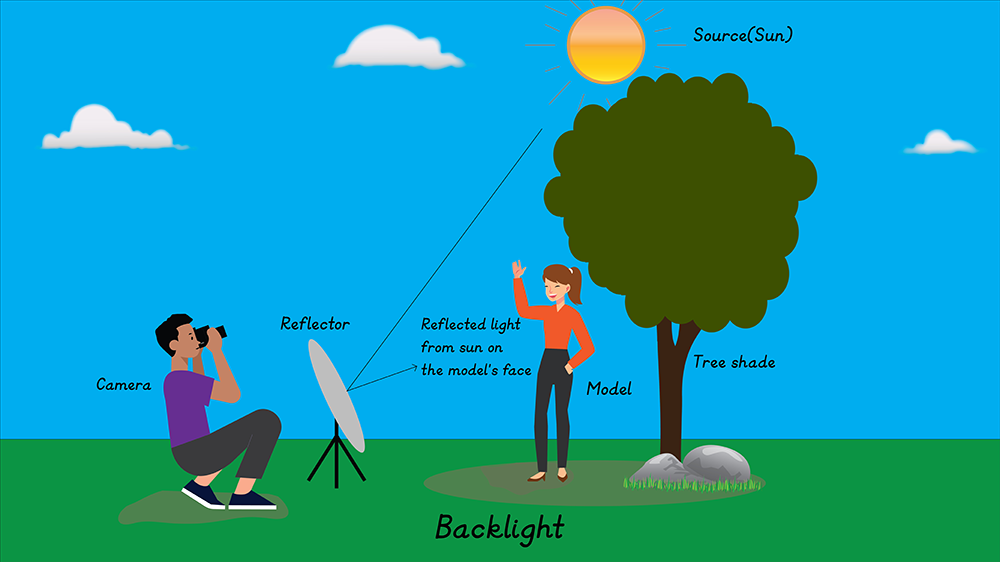
In the below photo light is from behind (bit angled towards right) the model but I have used reflector to bounce back some light to model’s face. This reduces the harshness of light and gave a smooth look.
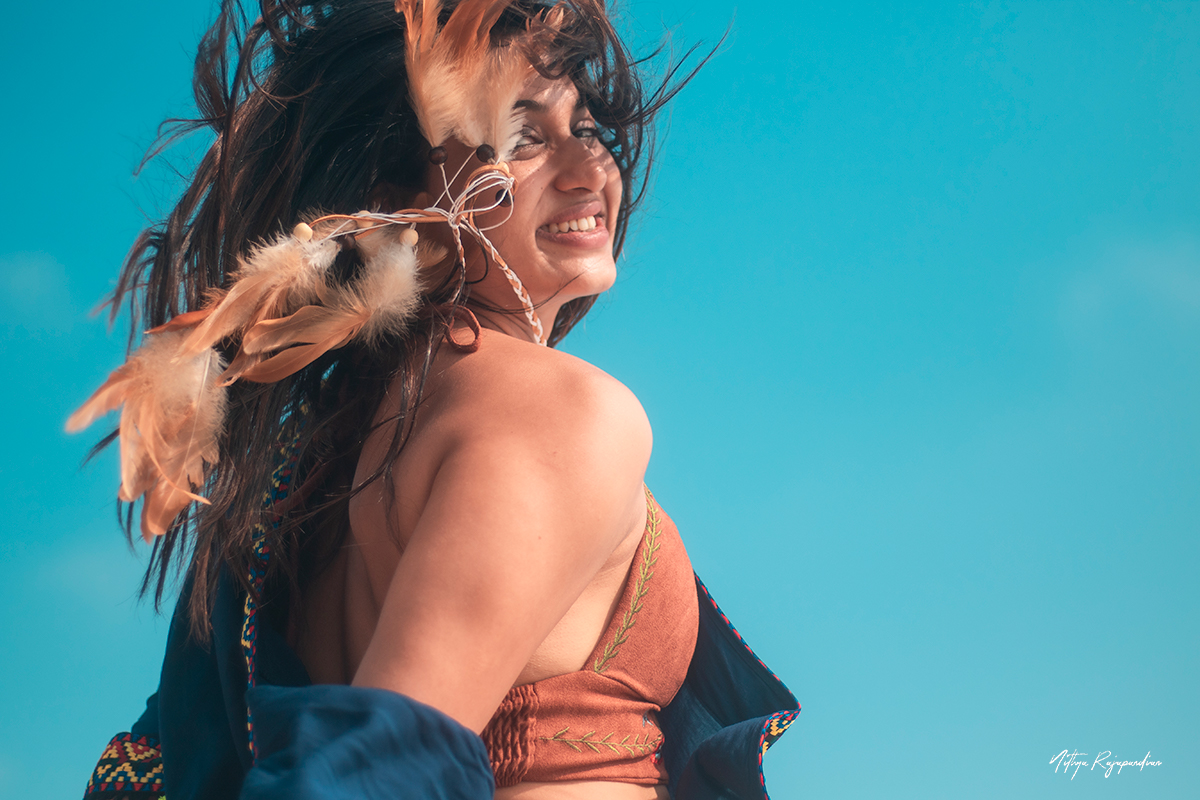
iii) Using a diffuser in harsh light when exposed for ambiance will cut the light, soften it and give a softened glow to the subject.
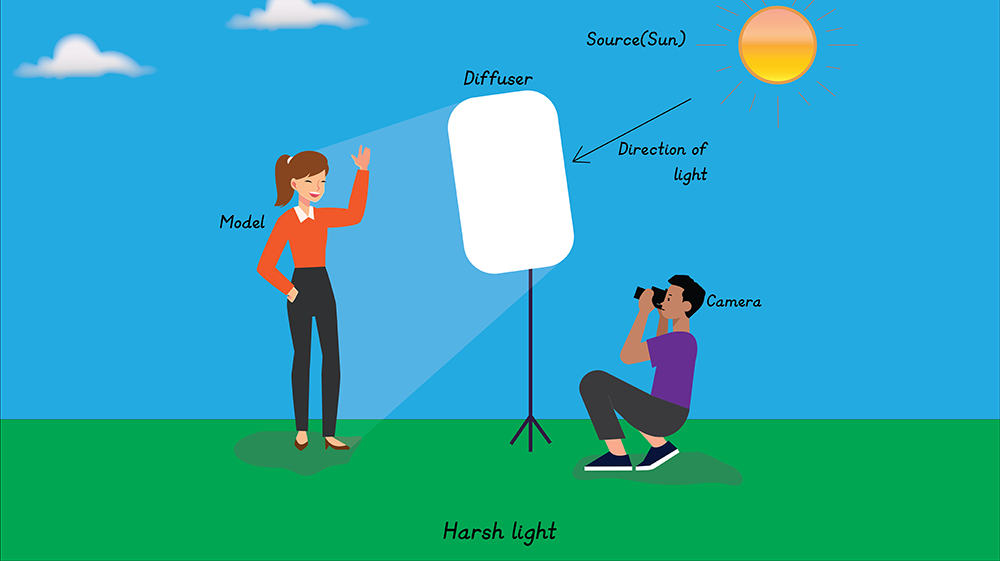
In the below photo a diffuser is used to soften the light to achieve smoothness in the face of model.
Like this there are numerous combinations of moods of natural light you can achieve using a light modifier. Also, you don’t need expensive gears or modifiers to work. Even a simple white chart or board can make a huge difference to your photos when it comes to modifying light very mindfully.
Don’t shy away from hard light
There is a general misconception that photographers should only create during the soft-light hours (golden hour / twilight mostly). If your vision is content driven then you would search for a time and mood of the day that suits your content rather than fixing the light first and then shoot something randomly.
So, if your content or concept demands you to shoot in hard light – then do not shy away from it. Try to think of modifiers or tools to modify your light and then use it effectively to your frame. Try to frame your subject smartly so that the hard light tends to add up to the ambiance.
Colors and light
This is one of the vast areas and it would almost take a complete article to delve in detail into it. However, to be precise, colors are inseparable from the nature of the light that reveals them. Objects illuminated by colored light sources are subtly transformed. This effect will be more noticeable in photographs than to the eye.
Direct sun, Low sun, back-light, diffused sunlight, Haze, mist & fog, Rain and storm, Dawn, dusk and night, snow, tungsten lighting – every lighting condition has its own characteristics with which it reacts to the colors in a photograph. The below photos shows how light impacts color in a Photograph. From below you can observe light in various parts of the day and the color tones that we perceive.
Some real-time photographs reflecting the different colors in various conditions.

Align mood of photo with the tone of light
The tone of the light has a great psychological impact on the human mind thereby influencing a particular mood when a person is looking at the frame. This highly impacts the natural light and colors.

There are three main qualities of light which together create the mood in the frame that you are aiming for. You need to mix the right amount of these harmony or contrast to suit your requirement.
On a high level these are the basics and it is indeed, as most of you know is a vast topic to be dealt with and we are planning to come up with detailed article on these parameters in the near future but for now we are trying to keep it brief to understand how these parameters directly or indirectly affect the use of natural light in your photographs.
- Hue
- Saturation
- Luminance
Hue defines a color or shade. It adjusts the tonal range of a colour on the colour wheel. It’s been proven (through various studies) that natural light can make you happier. It sets the mood to a happier note. So choosing a hue that defines the mood in natural light will yield magical results.
Saturation defines how intense the color is. More saturated hues can have an exaggerated effects on our mood, while muted colors can cool down or neutralize emotions.
Luminance is the intensity of light given off by a light source, usually expressed in lumens.
Depending on how well you manipulate these parameters of a color and blend it with natural light you achieve the mood of the photograph that you are planning to produce.
Hope you found this article useful and learnt something new. Try these out in your future photo-shoots. Would love to hear your feedback in the comments section below.
Great information , this is really helpful to me (I understand the use of natural light very well)
Thank you 😇🙏
Thank you Akshay.
This is great article.It realy help me to learn about colour parameters.
Sir We want more articles on this topic
Sure Shrinath, we will post more guide articles on Natural light